patcher_redownload
Table of Contents
How to Remove `freya.imf` and Restart Freya
This guide will show you how to resolve common patching issues by deleting the `freya.imf` file and restarting the Freya Patcher.
📂 Step 1: Open the Freya Directory
- Locate the folder where you installed Freya.
- By default, it’s in your `C:\Games\Gemstone` folder or the custom location you selected during installation.
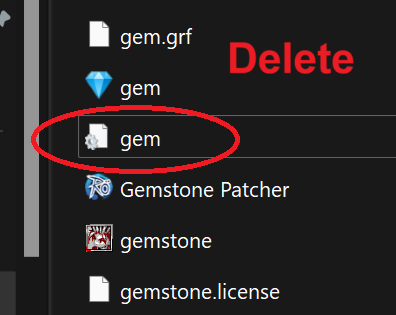
Here is an example of what the directory looks like:

🗑️ Step 2: Identify the `freya.imf` File
- Look for the file named `freya.imf` in your Freya directory.
- The file usually has a gear icon.
⚠️ Important: Do not delete any other files in this folder.
🖱️ Step 3: Delete the `freya.imf` File
- Right-click on the `freya.imf` file.
- Select Delete from the context menu. Alternatively, select the file and press the Delete key on your keyboard.
🔄 Step 4: Restart the Patcher
- Open the Gemstone Patcher application from the same directory.
- Allow the patcher to re-download the necessary files.
🎮 Step 5: Launch the Game
- After the patching process is complete, click Start in the patcher to launch Freya.
- The game should now function without issues.
🔔 Why Should You Do This?
The Patcher can occasionally cause mismatches and miss some updates. Deleting the `freya.imf` file ensures the patcher retrieves updated settings, automatically resolving potential problems.
If you encounter further issues, feel free to contact us on Discord.
Quick Steps Summary
| Step | Action | Icon |
|---|---|---|
| Step 1 | Locate the Freya directory | 📂 |
| Step 2 | Identify the `freya.imf` file | 🗑️ |
| Step 3 | Delete the `freya.imf` file | 🖱️ |
| Step 4 | Restart the Freya Patcher | 🔄 |
| Step 5 | Launch the game through the patcher | 🎮 |
patcher_redownload.txt · Last modified: 2025/06/08 10:22 by 127.0.0.1
